Showing posts with label sugar. Show all posts

Saturday 25 June 2011

Spelt Bread Easy Recipe


To make the above two loafs of spelt bread i used:

Ingredients:

1Kg spelt flour
2 sachets (7or 5grms each ) of dried quick yeast
1 tablespoon full of fine marine salt
3 tablespoons of sunflower oils
1 tablespoon of sugar
650 mls of warm water

The process of making the bread i found quite easy. I placed the flour in a bowl and the dried yeast mixing this well, then I made a well and on on one wall side of the well I placed the salt, on the opposite wall the sugar, I then proceeded to add half of the water and the oil and mixing it with my had, and as it got dryer i kept adding more water until all was gone.

You should end up with a soft and very sticky dough, which then on a table top I squeezed and stretched repeatedly for around 20 minutes bringing it together every time i carried that motion, this is to get the gluten working well, finally I dusted another bowl with a little flour and placed the dough inside, covering this recipient with cling film, then a cloth finally inside a plastic carrier bag and placed it in the warmest place in my house for about 4 hours.

I returned to it later, removed coverings kneaded it again for about 3-4 minutes placed it in the baking tins pre-dusted with flour placing each tin inside a tied up plastic bag and than placed it in a warm oven (to get oven warm i switched it on for about 2 minutes and switched it off) and let them to rise again for around 40 minutes.

Than I removed the loafs preheated the oven for at 200 Celsius (also placed a little ramekin with a little water in the oven, helps making a crispier crust) and baked the bread for 40 minutes until golden brown and when knocked make a hollow sound, removed them from the oven placed them on a cooling rack until cold covered with a cloth.


 I love the smell of fresh baked bread is fantastic, this bread was the best one so far... consistency slightly elastic it bounces back when pushed, nice formation of bubbles, dense yet light, nice fresh or toasted...and a wonderful crispy crust (for those who like, for less crispy do not put ramekin with water in the oven)

Happy baking!!!

Friday 16 April 2010

Chocolate Cheese Cake


Ingredients for Recipe:

  • 1 bar of dark chocolate, around 150grs (cocoa, min 50% max 65%)
  • 250grs of whipping cream.
  • 250grs of Mascarpone cheese.
  • 70grs + 50grs of butter
  • 10-12 digestive biscuits (crushed)
  • White chocolate buttons (about 20)
  • 1 cap of chocolate liquor
  • (Optional 1 to 1 / 2 sheets of gelatin dissolved in 2-3 tablespoons of warm water)


Get two bowls and a cheesecake tin, put the biscuits in one of the bowls and completely crush them till resembling breadcrumbs, to these add the 70 grams of softened butter and the chocolate liquor as well as two tablespoons full of the chocolate ganache (see below on how to make this ganache, made with butter instead of cream ) mix well and put it in the cheesecake tin, pressing it with a smooth surface like the bottom of a glass, to about 1 cm thick.


In another bowl put the cream and whisk it until almost fully whipped, adding to it the powdered sugar, continue whisking until fully thick whipped. Aside mix chocolate ganache (also optionally add the dissolved gelatin, I prefer it without) with mascarpone cheese, after being well integrated pour it in the the whipped cream and mix lightly until well blended.

Now put this mixture over the pressed down biscuit mixture and spread it evenly with a spatula. Garnish it with white chocolate buttons and refrigerate a minimum 1 hour, better if it stays a few hours.

The ganache is very simple to make .... put the chocolate squares in a glass bowl immersed in a bain marie once melted, mix it with the butter 50g (+ or-) until well incorporated.

This is a recipe that I tried and would recommend to be tested by you too. I promise you  not to be disappointed.


Monday 1 March 2010

Cherries Cheesecake


Recipe Ingredients:

  • 300grs well matured cherries
  • 250grs mascarpone cheese
  • 200grs sugar
  • 8-10 digestive biscuits
  • 2 soup spoons of butter
  • optional, cherry liquor + a little vanilla essence


Preparation:

Put in a pan the cherries chopped + the sugar, boil it as if you were going to make jam, but you turn of the stove one step before it becomes jam, as you just want a delicious fruit compote, and then let it cool down completely.

Meanwhile place in a bowl the finely crunched digestives, the butter and half of the cherries liquor, mix all very well. Once well mixed place them in the container you wish to make the cheesecake spreading it evenly throughout the base and press firmly down with the base of a drinking glass.

Next step is to get another bowl and place there the mascarpone two thirds of the cooled compote and the remaining cherries liquor, mix all very well in a folding motion, and place the mix on top of the previously laid biscuits spreading it evenly....finally place the remaining compote on top of this in a circle smaller than the circumference of the cheesecake, and with a stick go around the circle line twirling circles over this one to get the same effect, or do it your own way hehe!!...it wil taste the same.

Finally refrigerate for a minimum of one hour and serve it with very strong black coffe for a treat. Bon Apettit!!


Thursday 29 October 2009

Pumpking Mousse with Pan Roasted Pumpkin Seeds - Halloween


Ingredients: (enough for 4-5 ramekins)
  • 1 thick pumpkin slice (pealed and chopped into little pieces)
  • 1 orange (juice and pulp)
  • 2 soup spoons of sugar
  • 250mls whipping cream (to whip into Chantilly)
  • 1 one heaped tea spoon of icing sugar
  • 1 hand full of pumpkin seeds


Preparation:

Easy, put a frying pan on the stove medium heat, place the seeds of pumpkin inside and keep stirring the frying pan (as if you were doing popcorn), once hot the seeds start to pop when these to stop popping they are ready. Put them on a plate and let them cool.

Meantime in a small pan put the chopped pumpkin plus the sugar and the juice (pulp) of the orange, let it come to boiling point and reduce the heat to minimum leaving it to cook for around 20 minutes stirring occasionally. once the pumpkin is semitransparent, then crush it (for example with a fork. masher) adds two or three tablespoons of water and keep it boiling for a further 10-15 minutes, until being like a moist compote , withdraw of the heat and leave to cool completely.

In a bowl whip the cream and halfway to becoming whipped cream add the powdered sugar in and beat the rest until quite firm, then add the compote of pumpkin and and most of the pumpkin seeds (pre-crushing these with your hands, and reserve a few to decorate the top of the sweets), once done refrigerate for at least 1 hour and eat it with pleasure.

It will have amazing textures and flavours the textures are, the crunchiness of the pumpkin seeds and the puking itself has a stringy but soft texture and the velvety smooth texture of the cream are a perfect combo here, as to the flavours pumpkin and orange what a blast and bursting smooth and zingy taste smoothed out by the cream WoW..you must make these they are great will make 6 ramekins.


Saturday 20 June 2009

Orange Cake "Large" for Slicing


Recipe Ingredients: (was enough to cut 70 rectangular slices)
  • 300grs of butter (or baking margarine)
  • 300grs of sugar
  • 4 oranges (2 cut in slices and 2 "whole" blitzed into creamy pulp)
  • 6 eggs
  • 300grs of flour
  • 2 soup spoon of baking powder
  • 2 teas spoons of orange essence
  • a little of dememera sugar


Couldn't be easier... Beat the sugar with the butter, until you obtain a light and whitish cream, once that is done put the eggs (pre-mixed) in, a little at the time keeping the beating of the cream, this way attaining even a more creamy and full of air dough.

Once that is done, add the two oranges in pulp + the orange essence, (mix the pulp in well with a wooden spoon in a folding gentle action to try not to release any of the air contained in the dough), lastly add the flour, a little at the time as well, again folding action and gentle, until all is incorporated in the dough.

Then place the dough in a large tray previously greased and floured, I also used a Teflon baking sheet to avoid the cake sticking to the pan (worked a treat). On top of the dough lay the orange slices and cover the top of each slice with some dememera sugar, to allow them to crystallize and not burn as that would leave a bitter taste, (also if you think the taste of the orange skin may be too strong for you, you can always peals the slicing oranges prior to slicing).

The whole thing goes in a preheated oven at 180ºC for around 20-25 minutes, once done remove the cake from the oven, and let it cool a little before attempting to remove it from the container, this is where the Teflon came in handy as I just picked the four corners of it to remove the cake from the container to a cooling rack.

Optionally at the end, you can also squeeze a further two oranges and boil the juice with some sugar to make a liquid syrup to pour over the cake and get it even more moist, as this is a moist cake already, and very spongy and light. Then let it cool completely and slice it into rectangles.

Sunday 31 May 2009

Mascarpone and Strawberry fake Flan


A super easy and delicious recipe all invented by me, your alternative to Jamie Oliver. Lol...


Recipe Ingredients:

  • 2 x pkts strawberry Jelly (I used Castello brand 135grs each)
  • 1 x pkt of mascarpone (250grs)
  • 3 soup spoons of sugar
  • 1 X punnet of fresh ripe strawberries around 250grs


A very easy to prepare and even easier to eat dessert. Make the two jellies as indicated on the back of the packet. After the jelly dissolved and fully mixed with the water you must let these ones cool until almost cold. While that is happening, wash the strawberries and remove green bits and them chop them into fine slices, place them on a little pan with the sugar and boil them for around 1-2 minutes, set it aside and let it cool completely, (I even put in the fridge to get this done faster as I didn't want the jelly to start solidifying.

Them mix the strawberries with the jelly and whisk them, once well mixed add the mascarpone and whisk come more, until well mixed place in a jelly mould and refrigerate until well solid. To remove run warm water on the sides of the mould until the jelly comes away from the walls then flip it onto a dishing plate ...it tastes great with a little mint.


Wednesday 20 May 2009

Almond filled Sponge Cake (was Anniversary Cake for my Twins on the 16May)


Ingredients: (for the cake)
  • 200g butter
  • 200g self raising flour
  • 200g sugar
  • 4 eggs
Preparation:
Mix the butter (soft) with the sugar, mixing it well with the mixer (or hand mixer)for enough time for the mixture to become a whitish cream, at this stage mix the eggs in a little at the time until they are all blended with the mixture, as you want this cream to be as airy as possible. Next is the flour, but this one you can fold in using maybe a spatula, as you want to preserve all that air you knocked in with the mixer, divide this cream into two pre-greased and floured baking tins, and goes in the oven at 180c for 20 minutes (do the toothpick check) just to ensure they are well cooked, let them cool a little then remove them from the baking tin and place them on a cooling rack.


Ingredients: (for the filling)
  • 50g caster sugar
  • 15g corn starch
  • 2g salt
  • 235ml milk
  • 30g grated almond
  • 2 eggs
  • 2 tea spoons of almond essence
  • 1 Vodka lid
Preparation:

Mix all the dry ingredients well, place all the wet ingredients in a small pan (minus the Vodka), now add all the dry ingredients to the wet ones in the pan, and put it on a medium heat and whisk it continuously as soon as it starts to thicken up reduce the heat to nearly minimum, otherwise will thicken too quick and will get lumpy, you want a smooth cream. After is thickened and will thicken no more cook for a further 2 minutes, then remove from the heat, add the vodka let it cool completely before using it you can even refrigerate.
(this almond cream is also excellent for profiteroles, croissants and much more)


Ingredients: (cake topping)
  • 1 glass of double cream
  • 3 soup spoons of powdered sugar
  • 1 tea spoon of vanilla essence
  • 1 hand full of hand chopped almonds (with the skin preferable)
Preparation:

Whip the double cream to make the whip, once whipping is about half way through add the vanilla essence and when is two thirds from being done add then 1 soup spoon of the powdered sugar and when is completed add the other 2 soup spoons of powdered sugar whisk a little more just enough to mix it and it is done to cover the cake.
Cover the cake with the aid of a spatula and then spread the hand chopped almonds over it.


Knife chopped almonds ...yum!!
Cake assembly:

decide which disc is going to be the base then level it by cutting it's top (see picture), this will aid in the filling adhering better and soaking in a little, also securing better the other disc.
So you then assemble it as follows, after cutting the base spread the filling around one centimetre thick all over the base, then place the second disc on top, then cover the whole cake with the whip and spread the almonds on top, the refrigerate at least half an hour before serving, more time even better, absolutely lovely with a nice strong coffee, there is something magical when coffee and almond flavours meet in your mouth.


I received these awards from Nina's Recipes and was very happy to have them, there are no rules written, so I assume one has to pass them along to about 7 other blogs as that is how many Nina passed.
Nominees please pass the awards bellow to 7 nominees (or more) of your choice, linking them to the award + linking on your post who nominated you, these are the simple rules


And this award was given to me by Sophie a long standing foodie friend here in my blog, which makes me very honoured to accept such a nice award.
In keeping with the tradition of passing this award forward, here are the rules. The Sisterhood Award is an award from bloggers to bloggers in recognition of a blog spot which shows attitude and/or gratitude.

1. Put the logo on your blog or post.
2. Nominate up to 10 blogs which show great attitude and/or gratitude
3. Be sure to link to your nominees within your post.
4. Let them know that they have received this award by commenting on their blog, or sending them an email.

Monday 13 April 2009

"Portuguese-Olhao Style" Folar (Folar = Easter Cake)


Recipe Ingredients: (enough for 20 people, or one of me lol)
  • 1Kg plain flour
  • 1 pkt instant east
  • 2 oranges (juice)
  • 1.5 decilitres of water
  • Sal
  • 125gr de soft margarine
  • 125gr soft butter
  • 125gr soft butter to spread
  • 1 shot of vodka
  • Brown sugar & Cinnamon "to sprinkle filling" (enough)
Put the flour in a large bowl and mix in straight away the east, after that open a little well in the centre and place in there the soft margarine and soft butter and also the orange juice, shot of vodka, water (warm preferred) and a pinch of salt.

With your hands mix all very well, I then covered it with a cloth and let the dough rest around 30 minutes, it will rise a little. Then cut it into 10 fist size balls, and with a rolling pin make one by one discs, but each disc you make spread some butter on one side and put generous amounts of brown sugar and cinnamon, make another disc butter it and again put on it generous amount of sugar and cinnamon over it and place it on top of the other disc, repeat the process for all 10 disc making two piles of five discs, as it makes two cakes.

Place each pile in a container, sprinkle again generously more sugar and cinnamon on top and set in aside in a warm place with a thick cloth over it for about an hour to raise, after that it goes baking in the oven 190-200c for around 35-40 minutes until is done. The idea is the sugar in the layer will melt with the cinnamon making like a gooey honey consistency sugar and cinnamon syrup in between each layer of cake, the cake will be a bit like bread but sweetened by some of the sugar being absorbed in. This is really delicious, but remember be generous with the sugar as if you put little it will all get absorbed into the cake and no nice gooey syrup in between the layers, will still be good though.

Also remember to take it out of the baking container while hot as if you let it cool the caramelized goo will solidify making it hard to remove from these.


Updated photo

Sunday 5 April 2009

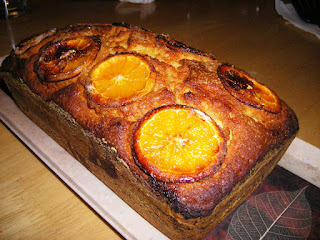
Light Orange Loaf Cake


Recipe Ingredients:
  • 300grs self raising flour
  • 200grs sugar
  • 100grs butter
  • 2 eggs
  • 3 small oranges (set aside the zest of 2, and the juice of the same 2, the 3rd one thinly slice it)


In a large bowl, put the sugar and the (soft) butter, beat it until is a whitish cream, then add the juice of one orange, and continue to beat for a further 2 minutes, then add the two eggs and beat it further 2 minutes more, the remaining orange juice and the zest of the 2 oranges and beat a further 2 minutes.

Finally add bit by bit the self raising flour, while still beating the dough, until it is all incorporated, at this stage stop and you can now place half on the dough in a loaf tin (previously greased and floured) on the top of the half of dough place half of the sliced orange, put the remaining dough on top and cover it with the remaining orange slices (see picture) and on top of each orange slice cover that with a little sugar, that will caramelize once cooked giving it an extra delicious taste.

Now it will take 25-30 minutes in medium oven 180c. and is ready to eat, so lovely with some green tea, as is very fluffy and light, if you prefer heavier add 2 more eggs at the egg stage.


I was inspired by Mary blog moist orange and lemon cake.

Saturday 14 March 2009

Rich Tea Biscuit Cake witth Almond


Ingredients for the Recipe: ( enough for many :D )
  • 4 yolks
  • 125 g butter
  • 125 g Fine sugar (Caster fine sugar)
  • 125 g Icing sugar
  • 40 g ground almonds (I ground my own for a more intense flavour)
  • 1/2 almond essence
  • +/- 2 packets McVities Rich Tea biscuits (or Maria biscuits)
  • 1 cup strong coffee (just warm nearly cold)
  • 10 flaked almonds (I flaked my own with my Santuku knife)


In a bowl place the yolks, butter (soft or into little cubes), sugars, and the almond essence, blend these very well with a mixer, until it forms a whitish cream, once it gets to that point add the almond while still mixing , mix these very well until all the ground almond is all blended in. Then refrigerate it for about an hour so it hardens to a thick cream consistency.

Then get the biscuits and one by one dip them in the (almost cold) coffee for about 3 seconds each, don't leave them too long or they will become soft and break apart, and also if too soft is impossible to spread the cream. Arrange them on a plate or tray one in the centre and six surrounding the centre one, then apply a thin layer of cream (that you had refrigerated), repeat the process until the cake is around 5-6 biscuits high, and finally cover the whole of the cake outside in the same cream, and sprinkle the almond flakes on top, them refrigerate until very cold and firm.

It is very nice served with a nice strong cup of coffee. I believe the original recipe doesn't have almonds at all and the walls and top of the cake is decorated with dessicated coconut shavings.
We all know that almond goes extremely well with coffee, as a lot of times when out for a coffee you get a little almond biscuit with it, therefore the reason why I used it.

Monday 9 February 2009

Mascarpone and Creme Fraiche Mousse with Blueberries


This was made when I received the day before yesterday all my family in my house for diner (they had come from Portugal) so I wanted to impress a little, and may I say with a big head I didn't disappoint them ...according to their comments.


Recipe Ingredients:

  • 8 digestives
  • 1 soup spoon of butter
  • 1 pkt of mascarpone (about 200grs)
  • 1 pkt of crème fraiche (about 250grs)
  • 1 punnet blueberries (about 250grs)
  • 4 soup spoons of sugar (+ a little extra)
  • 1/2 lemon (just the juice)
  • 1 lid of vanilla essence
Just put a the lemon juice the sugar and the berries in a little pan and take it to the stove medium heat, after about 3 minutes the berries start bursting (you know this as the liquid starts to gain the berries colour) squish them with a potato masher, and then let them cook for a further about 5 minutes. Set it aside ready to mix with the mousse.

Prior to making the mousse, you need to line the base of the ramekins with the digestive, so to prepare the digestive for this, in a bowl with your hands crush the digestives until they nothing but powder, then put the butter and the vanilla essence in and still with your hands mix it in until it resembles crumbs, at this stage divide them equally through the ramekins and flatten it down with the base of a glass that fits into the ramekin. They are now ready for the mousse.

On a bowl mix the mascarpone and the crème fraiche and a little sugar (about one heaped then spoon) with a whisk until a smooth paste achieved , pouring in a bit at time of the blueberries compote keep whisking and add it till all is in, than spoon them evenly to the ramekins and refrigerate for a minimum of 30 minutes before serving and that is it.


Attribute

If you use any recipes from this site on your blog and/or are inspired by them in the making of a dish on your blog, please acknowledge it by attributing a link as a thank you concerning it's source.... THANK YOU.

PS:
No spam or advertizing will ever be plubished here, don't even try as all comments are checked before publishing.
If you want to place an advert here, payment must be arranjed first.

Rico - Tried and Tested Recipes

Hi my name is Rico (short for Ricardo) will regularly add more food content to this blog, all my recipes are tried and tested, as I make them and eat them as well as my family, so I wouldn't give you something that is not good.

Recipes published here, will try to conform to the following criteria:

-Easy to create or bake.
-Will be nutritious, wholesome and healthy as well as economical too.
- Will be varied and inventive, mostly created by me.
-Occasionally I will treat you to some indulgent ones. But just as a treat. lol :)
- If I use other blog recipes will be to pey homenage and I will definitly link it, appreciated if the same is done for mine.

I will try to respond to all comments made, and visit their owners, however I run a no strings attached blog here when I comment on other blogs I do not expect to have them come here the same way I don't accept if I am commented on that the person will expect my visit to their blog, no commitments, but as I said I will try.

I also want this opportunity to say, thank you al that have continuously vsited me and new people visiting me you are the reason why I am here, I am not here just to get numbrs or self publicise, I am here for real friends and real opinions and to be nice to all. THANK YOU ALL :) xx

Don't just visit in a rush...subscribe to a feed, get updated automatically when I put new foods up, it is fun.